Posts

Showing posts from 2008

The gate is done!

Image
I finished the gate. Finally. I'm still undecided about putting a handle on the left side as well but other than that I'm very pleased. It's made of cedar and has copper pipe set in the top. I'm curious to see how square it stays over time. It's all bolted together from the sides and the boards in the middle are 1" thick and have been glued with tongues and grooves.

Osprey dives for koi

So ... I went out to feed the fish the other day and noticed a bird circling above the back yard.  We often have hawks up there but this one looked different and was a lot lower.  It perched on a tree and so I grabbed the camera and caught it doing this:

Adding a UV filter

Image
This is the AQUA 57Watt UV filter I added to the system. After adding a bypass, it has about 2000GPH flowing through it. Here's the pond before we turned it on. We went away on a 3 day holiday and were pleasantly surprised to find our pond all clear to the bottom!

Matala filter in action

Do It Yourself Matala filter

Image
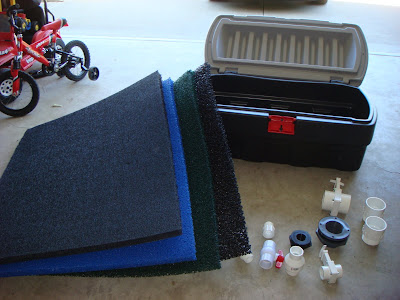
Here are the parts for my new mechanical filter. 4 sheets of matala filter, a rubbermaid truck box and various fittings. It took a day to put together and get working. This filter is now the first after the pump. It drains into a 40gal brute can full of plastic scrubbies and left-over matala bits. This filter will work for the next year, until I build some fiberglass boxes. On the left (inside the box), you see a flex hose. That's the water input. I put the hose on there so I can easily clean the filters with pond water and back flush the box by moving the end of the hose to the other side. If I need to drain the box to work on it, I just stick the end of the hose into the drain pipe on the right and open the drain plug. That way I can keep the rest of the filtration system running. All tucked away under the stairs. Next year, when we build the deck this will be hidden away.

A Ray of Sunshine

Image
Despite a record cold June so far we still enjoy watching the pond plants bloom.

We have fish!

Image
It's been a slow week pond-wise but the electical is all wired up. Kari is happy that she doesn't have to mow around an extension cord anymore. :) We picked up ten koi today from a local guy who had a good spawn 2 years ago. So far they're sticking together and exploring every corner of the pond. They play follow the leader. If one swims into the skimmer then the other nine follow suit. At least they all follow the first one out again a minute later. Three of the goldfish have decided to join the koi but they have to really hustle to keep up!

The skimmer is skimming

Image
What a beautiful day! Here's the skimmer (the square can). It works very well so far. I sanded and stained the cedar trim. I'm very happy with how it turned out.
Image
Here are the parts for the skimmer. I found a square rubbermaid heavy duty garbage can. I then cut two frames from 1/4" plastic and purchased enough stainless steel bolts for the job. I've got some work to do in preparing the pond. I'll get started on that if it ever stops raining. :)

Cedar Trim

Image
The trim hangs about 1 1/2" over the water and about 1/2" above it. I installed it over the weekend. I cut 1/4" thick plastic washers to go under the 2x6 cedar trim. This will let the water from the pond run under the boards if the level gets to high and help prevent rot. Then, I counter-sunk 4" lag bolts through the boards and plugged them with hot glue and dowels. I'll sand and stain the boards and dowels soon. It's supposed to warm up in the next few days! Then on to the skimmer.

The Bridge 2.0

Image
Pond Bridge The bridge is back in black. I like this version a lot better. It sits nicely about 1cm off the water with very little deflection in the middle, even with 3 adults standing on it. The reflection of the trees in the water is nice too. There are four slats to the left that are hinged. The skimmer will hide under there and the bridge section opens up to empty the basket. Once the skimmer is built that is. Pics of that to follow. Here's the pump and filter circuit. This week I tackle the skimmer and waterfall!

Building the bridge

Image
The boys do some sanding. These are the cross pieces for the bridge. Here's the bridge in place. It was stained with Behr's natural stain. After putting it all together I'm thinking that the bridge is too much. It looks nice enough but all I see is bridge. It stands out so much that it seems to eclipse the entire pond. I'm now thinking about what to do about it. Perhaps staining it a dark colour, even black? Another option would be to drill holes in each plank. 8 -10 per plank ... drilled and routered ... yikes, that's a lot of work! As I was sketching out some ideas I also figured out that the bridge needs to be raised a bit to let surface debris make it to the skimmer. That thought led me to think about putting the skimmer under the bridge. Then I'd need to make some sort of access hatch in the bridge. Oh man, just when I thought this part of the project was done.

Bridge building

Image
We drained the pond (sadly) and started building the bench (left) and the bridge (center).

Time for some H20

Image
The liner is in! We put in 2 layers of underlay first, then the liner. Time to fill 'er up. We babysat the liner and kept shifting it to smooth things out. We trimmed the edges and filled up the pond. It is level to 2mm (1/16"). You can see the waterfall in the background. The sound was fantasic! Now we need to drain it to put in the bridge and build the bench. It's such a waste of water, but necessary.

Buiding a frame.

Image
The pond is about 15000 liters (4000 gallons) and 1.5 meters (5ft) deep at the lowest point. For this pond, we decided that a treated wood frame would make an ideal attachment point for the pond liner. On one side there was a lot of gravel so concrete footings were used to keep the 4x4 posts level and solid. 3ft rebar was pounded through the posts at 2ft intervals. Once the liner is in, cedar 2x6 boards will cover the liner and create a small overhang around the pond. There will also be a 4ft wide bridge spanning the center, to access the patio. There will be a bench that hangs over the pond in one corner. All pipes, electrical and other connections will be built inside the bench and hidden from view. This means that the liner doesn't need to be punctured for bulkhead fittings. The entire design also means that the liner can be removed or replaced fairly easily. Just remove the cedar trim and pull out the liner. We're working on a design for an in-pond skimmer that will also hi

The hole is done!

Image
We actually ended up going down another foot on one side to create a slope but at this point you can get an idea on the size.

Let the excavation commence!

Image
You can see the outline of the pond from the string-lines The whole family gets involved